Friday 30 August 2013

Birdsmouth Past Mast - Day 6

Birdsmouth Mast - weighed a hefty 45lbs this morning - 7 hours later plus lots of elbow grease, it's now 34lbs!  That's 11lbs worth of shavings which were created by hand by your truly...

Today the planing was more successful, accompanied by several trips to the Japanese Waterstones. The plane worked effortlessly taking of shavings some of which were 3 foot long!  (Is this a record?!!)

The bulk of the work was getting the taper down to the required dimensions - once that was accomplished, rounding the octagonal shape to 16 sides and then round went very quickly.  Which serves as a useful lesson to other builders contemplating using a compound taper - it's a lot of extra work.

I did have some issues with different staves having its grain in opposite directions each side of the scarf joint, which meant I had to reverse the planing direction.  I found that the #6 Foreplane worked well when pulled, Japanese style, which allowed me use different muscles rather than just pushing all the time.

Using my spar calipers, I made sure that the diameter was uniform at each station.  Also, I kept the octagonal shape, which made for more consistent planing.  I was even tempted to leave the mast finished in octagonal form - I really like that shape...throwback to my early days with split cane fly fishing rods....

I decided not to reduce the diameter down to the final dimension at the top quarter of the mast, as I was nervous that the extra planing would remove too much of the birdsmouth joint.  However since the mast was coming out so relatively light, I didn't feel that this would be a handicap.
Bottom of mast showing internal plug made also birdsmouth style
I made sure to mark and keep the track (aft) side of the mast straight when gluing up and in the finish, I left this side straight to take the sail track.  It's probably too wide at 35mm, but I'll refine this when I get the track in hand.  I have no idea where to source this - can it be shipped in a coil or is it bought in one long length??

I recall reading on some forum where it was suggested to keep planing until you are finished or bored...I think i took the latter route, but nevertheless, I now have a nice 23' spar hanging diagonally from the ceiling of my 20' x 20' workshop. Phew!!

Thursday 29 August 2013

Birdsmouth Mast - Day 5

This morning I unwrapped the mast from its overnight coat and was pleased to see that the epoxy was well set.  So I enthusiastically set about planing back the mast  - first removing the epoxy coat from the wood was quite a struggle - even my trusty farriers file was baulking at the challenge.  I alternated between it an an old Anant Jack plane which did a reasonably job, still by lunchtime I had just about removed all traces of epoxy.

I raised the mast vertical to see how manageable it is - quite a handful, but then there is lots of material to be removed as I had only placed 50% of the taper in the staves width.  This sounded like a good idea at the time, courtesy of John O'Neill article, but the reality of planing back so much taper is quite a drudgery.

Out with the Foreplane and the additional heft was giving me some advantage, but only later in the day did I take time out to resharpen the blade, which made a considerable difference.Duh!!  However by that stage I was quite tired so resigned myself the the fact that my mast was going to take longer than 5 days!.

So far I have been planing back the taper while keeping the mast octagonal - which I think make for a more uniform approach.  I did take time out to research making a a spar gauge for 16 sides, and while it seemed to be a sturdy gauge, the pencils lead kept breaking and so in reality was not a success.  Maybe I can replace for two ballpoint pens and see how that
works out...maybe others have better ideas??  Please feel free to comment.
I transferred the dimensions at the various stations onto my workbench (ladder) and used a calipers to constantly check my taper.  This was quite depressing....several passes of the plane on eight sides just for 1 millimeter!  I need to take up to 5mm off the staves in some parts!  

I'm beginning to doubt the wisdom of only taking 50% of the taper from the width of the staves as the result is that the planing of the outside of the mast is leaving the shape of the birdsmouth joint asymmetrical and could even results at the very top of the mast where the birdmouth joint just becomes an edge joint, although that may not be a problem as there is a solid plug at that point.  I also had some excellent feedback from Dave Johnson who recently completed his Somes Sound and blog.  Dave also built a birdsmouth mast but did not increase its diameter from the specified width of the solid mast.  Dave reports that the boat sails really well and the mast is light.  You can see his excellent blog here and admire a beautifully build Somes Sound.

Wednesday 28 August 2013

Birdsmouth Mast Day 4


This morning, I cleaned off the epoxy from the inner plugs using my trusty farriers file....easy!

The plug for the bottom of the mast seemed a little oversized and I had to plane it quite a bit to get a good fit, especially at the base of the mast where it is tapered down from the gooseneck.  Brian made up the solid plug or the top of the mast - we planed down a 50mm square piece of DF stock - with hindsight, it might have been easier on the table saw, as the octagonal shape was hard to form freehand.

So today was somewhat of a milestone...we finally managed to get the mast glued up, which was a family/team effort with Siobhan, Jane & friend Brian gloved up and spreading epoxy over 8 staves on 3 sides, each 23' long...so 552 ft of stave surfaces covered, while Clare took the pics!  We used old toothbrushes which proved superior to small paint brushes which were improved somewhat by cutting their bristles short.

I set up the ladder straight such that the mast would lie flat on the rungs of the ladder and so define a straight edge which would be the aft side of the mast, transferring all of the taper to the front of the mast.  I'm led to believe that this will allow for better sail trim as well as a straight sail track.

We made up ply forms the with an octagonal hole in them which helped considerably in forming the mast together...just one at each end and the mast was quite easy to assemble.

Here you can see the mast epoxied and initially assembled.  We used a variety of hose clamps, cable ties and spanish windlasses to pull the staves together.  This produced a satisfying squeeze out, which reassured me that we had adequate epoxy in the joints.

Tomorrow I may start planing down the mast to its final dimensions.  We have deliberately left half of the taper to be removed from planing the outside of the mast rather than solely tapering the width of the staves.  However as I do not yet have the hardware to position on the mast, I will leave the mast rough finished before finishing to final dimensions, which should allow some wiggle room for fitting the hardware.  The specifications call for a rectangular shape to the head of the mast to facilitate mast fittings and a square base to sit into the mast "step" ( I think that is the right term).  Given that my mast is now octagonal, I will have to examine how best to make the step for the bottom of the mast.


Tuesday 27 August 2013

Birdsmouth - Day3

I read where someone created their birdsmouth mast in 5 or so hours...well this is Day 3 and still not finished, but steady progress nonetheless.

Rather than fiddling around with taper jigs for the tablesaw, I took advantage of the clement weather and fired up my Quansheng Foreplane and tapered the staves by hand.  In fact it was quite a fast operation and I felt a lot safer in the process, still smarting from yesterday's episode on the table saw....

Once again Brian came along to lend a hand...very welcome when managing 23ft staves..

The staves have all being tapered according to the dimensions which I worked out  (see earlier posts) and I made up two plugs in birdsmouth design for the bottom of the mast and where the shrouds and forestay are fastened to the mast.  I feathered the ends of the plugs to ensure no hard spots exist.  I'm hopeful that the extra effort will result in a sturdy light mast.

Tonight I glued up the birdsmouth plugs which was quite straightforward, although I was surprised at how much epoxy was used in the process.  Tomorrow, I plan to clean off the plugs and plane them down to size to fit the inside of the mast.  Hopefully by tomorrow evening I will have mast finally glued up, and then Day 5 will plane down and bring the mast diameter to its final dimensions.....so much for 5 hours!

Monday 26 August 2013

Birdsmouth Mast - Day 2

Today I managed to clean down the scarf joints armed with my Farriers File - Thanks Andrew for the hint!  The scarf joints turned out well and the staves dead straight, thanks to the aluminium ladder which I rigged up hastily as a bench.

The duck tape worked fine to hold the scarf joint together while the epoxy set over night.  Additionally I lightly clamped all the staves together separated by polythene sheets against the side of the ladder which further ensured that everything was held straight in both vertical and horizontal planes.

Then assisted by Brian, we ran the staves through the planer to clean up the saw marks and reduce the staves to their final thickness, 13.6mm.   Once again the ladder made for a very serviceable outfeed table.

Once we had the staves dimensioned we cut the lengths to the approximate size of 23' which allowed us remove several feet from the least attractive ends of the staves and also resulted in the scarf joints being positioned more randomly along the mast.

Next came the process of cutting the birdsmouth V notches in the sides of the staves.  We set up the table saw using two featherboards which resulted in a consistent clan notch cut from the staves, except for the last few inches where the stave ran past the feather board.  This shouldn't cause any issue as we have cut the staves extra long by some 7 inches.

The featherboards kept manners on the staves as they were passed through the table saw, however on the second pass of each stave the saw produced needle shard cutoffs one of which was expelled into my finger with some force, resulting in a badly swollen finger...So my advice would be to be watchful for this and wear gloves, which I subsequently did and benefited from their protection as further needles were projected from the saw.

So next on the agenda is to cut the taper into the staves on the side opposite to the V notch.  I have not yet decided whether to make up a jig for te table saw or simply place all the staves side by side and use an electric and hand plane to cut out the tapers.


Birdsmouth Mast

I decided to attempt making a birdsmouth mast which initially I viewed as beyond my capabilities but on researching further and reading extensively, I believed the hype that in fact it is quite easy and doable for the home amateur builder.

Using John O'Neil's excellent article in Duckworks Birdsmouth in Practice  I set up a spreadsheet calculating the tapers, widths and thicknesses of the staves. I elected to add 10% extra diameter over JB's specified plans and used a ratio of 15% of diameter for the thickness of the staves, which resulted in 35.6mm stave width and 13.7mm thick at the fattest part of the mast.

Ripping 14mm staves
So armed with two 35mm thick DF boards of 16' and 14', I ripped these into 14mm widths and scarfed these together to give me a selection of staves ready for cutting birdsmouth.  Some lengths had two scarfs due to knots which I removed, but generally the stock was of good straight grain and knot free...thank you Robbins Timber.

I made a scarfing jig for my table saw which has a sliding table.  This proved successful and stress free - no flying pieces and I was able to stand out of the line of fire with hands well away from the nasty parts.  I had read where people had suffered injuries using scarfing jigs on the table saw, but I'm glad to report this worked flawlessly.

The glue up was quite straightforward - thanks to help from my son - thanks Harry!.  We laid out the staves on a aluminium ladder which provided a straight bench and a straight side to clamp all the scarfs to, so I am very hopeful that we will have a selection of straight long staves from which to start machining the birdmouth v-notch and tapering.  I am going to cut off half the taper from the width and leave the remaining taper to be planed / sanded off the stave thickness which I hope will create a more uniform creation, rather than simply having the same thickness all the way up the mast.


Sunday 25 August 2013

Deck Beams & Stringers

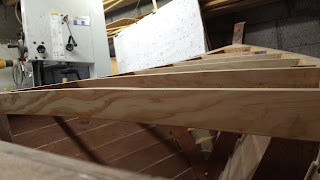
A few months break from building came to an abrupt end when last week, I spent some quality time on fitting out the deck beams and stringers.  This was challenging for me but ultimately quite satisfying as there were three joints for each beam to align.  The centre stringer is reproduced from the full sized plan, so not much to go wrong there...it is curious to see that the stringer actually dips from the bow stem to the mast bulkhead, even though it rises higher than the sheer.

No doubt the expert builders can measure and cut each beam first time, but I found I had to nudge into each joint little by little.  I toyed with the idea of purchasing a bench combination disc / belt sander, but my wife reminded me that this was just a hobby and so I took the advice of an earlier commentator on this blog to buy a farriers file, which I put to good use along with may smaller Japanese file, shown here refining the sloped mortice for the deck beam.

Fitting the breasthook was deemed to be a simple affair as per JB's instructions, however, while I managed a reasonable first pass, I resorted to chalking the sheer clamps to guide me where to remove material.  Eventually, I succeeded in producing a passable example although, arguably no one will ever get to inspect it, as it will be covered by the decking....

The deck beams were cut out on the bandsaw following the camber template which I made - rising 2" over 6'.  This worked well for the mast bulkhead and beam.  However as I approached the bow the deck beams needed to have a higher camber to fit in with the profile of the stringer, which I copied faithfully from the FSP.  Also I fitted the breasthook proud of the sheerclamp to allow me profile it to the higher camber.  It will be interesting to see how the ply deck sits on tops of these.

Earlier during the summer, I fabricated the centreboard.  However it is still in its beta stage as I understand that attention to the profile dimensions will pay dividends in the boats pointing ability.  I'm unsure if the specified dimensions include the fibreglass sheething.   I have yet to glass the board - it's been many years since I used fiberglass cloth, so I'm not familiar with the current thinking on which material to use...any ideas?

I have yet to pour lead ballast into the board which should be fun!

Before glueing up the deck beams and stringer, I had to cut out the hole of the bulkhead hatch.  As JB points out this is better done at the bench before the bulkhead is fitted, alas, I omitted this step and so had the challenge of cutting out the hatch in situ.  Once again my Bosch multi-tool came to the rescue which allow me cut a fine line to start the jigsaw, as I wanted to retain the cutout to be re-purposed as the hatch door.  I decided not to use plastic hatches so I am optimistic that this plywood version will fit the bill.